Official Luthiers Forum! http://www-.luthiersforum.com/forum/ |
|
Go Bar tips http://www-.luthiersforum.com/forum/viewtopic.php?f=10102&t=3814 |
Page 1 of 2 |
Author: | letseatpaste [ Wed Nov 16, 2005 7:52 am ] |
Post subject: | |
I need some tips for using a go-bar deck (not tips for my go-bars). The weird thing is, I don't remember having any problems using one in the Fleishman class. Since a brace is typically taller than it is wide, and then put pressure on it from the top with go-bars, you just barely have to look at it the wrong way and it wants to buckle sideways and tip the brace over. Is it typical to have to place blocks around the brace to keep it from tipping? I almost never see that in pictures of people's go-bar setups. 
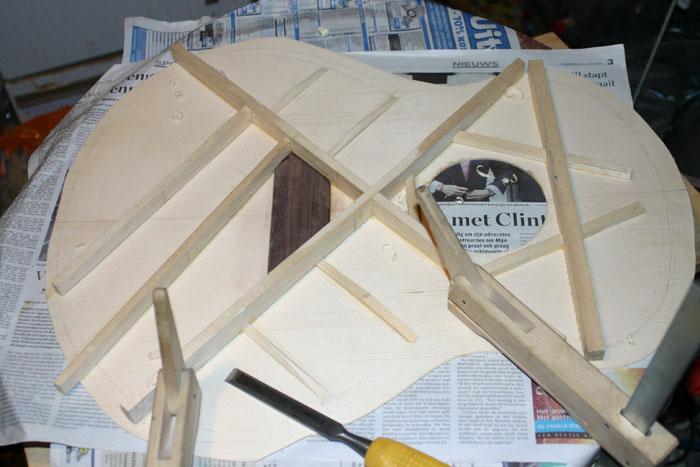
I was doing a dry run with a back brace, and it exploded 2 secs before the timer on the camera took the pic... ![]() |
Author: | LanceK [ Wed Nov 16, 2005 7:56 am ] |
Post subject: | |
Move the area that your bracing to the center of the radius dish. That way the bars are pushing down rather than at an angle. Dont ask me how i know this ![]() |
Author: | Barry Daniels [ Wed Nov 16, 2005 7:57 am ] |
Post subject: | |
That's an awful tall brace. If you plane it down closer to the final dimension it will be less likely to tip over. Also check the fit of the brace against the radius dish and make sure it is at 90 degrees. |
Author: | Mattia Valente [ Wed Nov 16, 2005 8:38 am ] |
Post subject: | |
1) Smaller braces 2) Center the piece 3) How much flex you getting out of your rods? Shortening by 2-4 inches should do the trick, really, more doesn't add huge amounts of pressure. 4) I orient them so the 'tilting' moment of various go-bars cancel each other out, and it works just find. Bit fiddly, but there you go. Works for me, even on fairly tall braces: ![]() To be fair, on backs, a tightly notched centre seam reinforcement keeps things nicely aligned, and on tops, the only braces that I don't glue on as combos are finger braces and tone bars. The X is self-aligning, and I notch A-braces through the upper transverse: ![]() Additonal support for the finger braces and the tone bars is provided the by the legs of the X itself, actually. Since I'm using titebond, I also kind of hold the braces in place with finger pressure until they start grabbing a little, and not slipping around like made, and then put in the first bar (one-handed), add a few more, and when it's stable, add the bars with two hands. I prefer lots of bars at moderate pressure, but then, I'm a newb, so take it with a grain of salt. |
Author: | letseatpaste [ Wed Nov 16, 2005 8:45 am ] |
Post subject: | |
Yeah, I was arranging the bars like you show there, Mattia. I think maybe I just need to plane down the brace a bit shorter. I think my go-bars weren't flexed even as much as yours, so I don't think that's the issue. Thanks, guys. |
Author: | letseatpaste [ Wed Nov 16, 2005 8:59 am ] |
Post subject: | |
In Harry's class he taught us to glue in the back braces first, and then cut the center strip to fit tightly between, but I was just thinking I bet that just that little bit of support against the side of the brace would help a lot in keeping it from buckling. |
Author: | tl507362 [ Wed Nov 16, 2005 10:44 am ] |
Post subject: | |
Jon, When you made the radius on the bottom of your brace, did you use a template and route them, or did you stick them in a radius dish and sand them? It is pretty easy to accidently tilt the brace as you sand in a dish, which causes the bottom of the brace to be slightly angled. I had that problem before and found out I was sanding the brace at an angle in the dish. Put it on a very flat surface and hold a square up to it, is it square? Tracy |
Author: | Ken Franklin [ Wed Nov 16, 2005 12:13 pm ] |
Post subject: | |
Jon, I make sure that each end of the bar is directly above the other and that helps. I also put some bars on the back (or top) so it won't shift around. Ken |
Author: | letseatpaste [ Wed Nov 16, 2005 4:31 pm ] |
Post subject: | |
Yeah, the bottom of the brace is perpendicular to the side. I'm starting to think maybe I should build a stouter go-bar deck or something. I'm just using all-thread for the four supports. I know most people seem to use all-thread through PVC and then tighten the nuts down on that, but it doesn't seem like it would be much more sturdy than what I have. |
Author: | csullivan [ Thu Nov 17, 2005 12:33 am ] |
Post subject: | |
Actually, using the pvc tubing over the all-thread puts the tubing in compression and adds considerable rigidity to the overall structure. Without the tubing you are relying soley on the bending strength of the threaded rod. The tubing also protects everything (wood, chisels, etc.) from inadvertently bumping into the sharp threads. Craig |
Author: | John Mayes [ Thu Nov 17, 2005 1:22 am ] |
Post subject: | |
One of my first go-bar decks I did no use PVC but rather the steel tubing that was just a tad bit larger than the all-thread. It left it no room to flex, and was very rigid. But the PVC plastic protection (say that 10X real fast) sounds like a neat feature... I'm using vacuum now (again) but I still like the feel of using go-bars... |
Author: | letseatpaste [ Thu Nov 17, 2005 1:49 am ] |
Post subject: | |
Yeah, I had thought about going the vacuum route, we did that in class, too, and it was so easy. I'm working in fairly limited space and I want to keep the number of largish jigs to a minimum. I think if I can stabilize the deck a bit that most of my problems will be taken care of. I was also thinking about making some wider blocks with a radiused bottom that I could use for glue ups, maybe lined with cork so it wouldn't scoot around. If anything, this would be handy for keeping things lined up... I get nervous sticking my head into a loaded go-bar deck to line up the brace (not that I actually do that). |
Author: | LanceK [ Thu Nov 17, 2005 1:57 am ] |
Post subject: | |
[QUOTE=tl507362] Jon, When you made the radius on the bottom of your brace, did you use a template and route them, or did you stick them in a radius dish and sand them? It is pretty easy to accidently tilt the brace as you sand in a dish, which causes the bottom of the brace to be slightly angled. I had that problem before and found out I was sanding the brace at an angle in the dish. Put it on a very flat surface and hold a square up to it, is it square? Tracy[/QUOTE] Tracy brings up a great point - any softening of the edges and the braces has a tendency to lean that way. I have always sanded the radius using a bowl, and have struggled with this problem. The last two backs I did I used Tracy’s brace making jig and a joiner and it was a very clean tight edge. I really like that jig Tracy! |
Author: | letseatpaste [ Thu Nov 17, 2005 2:21 am ] |
Post subject: | |
A jig like that would be great for my back braces, but I'm going to have a cylindrical top instead of spherical. So when I'm sanding the profile to the bottom of the X-brace pieces, I need to hold them at 45 deg as I sand it back and forth in the cylindrical dish, to get the right profile on the bottom of the brace. It worked fine in class, as long as I kept a firm grip on the brace and don't let it tilt while I sand. |
Author: | Paul Schulte [ Thu Nov 17, 2005 4:03 am ] |
Post subject: | |
On my go-bar deck I used some 3M spray adhesive and glued a carpet remnant to the underside of the top of the deck. It helps stablilze the rod by having something to "dig" into up there. Not my invention learned it on the MIMF some years ago. If you are using wooden go-bars I think it's Mario Proulx that uses flat wooden go-bars with notches cut into the bottom of the go-bar that fit over the braces helping to hold them in place. Sounds like a good way to go. |
Author: | letseatpaste [ Thu Nov 17, 2005 4:24 am ] |
Post subject: | |
Mario's flat wooden bars with the notches also gives me an idea about how I could adapt that concept to 1/4" fiber glass rods... hmmm. |
Author: | Daniel M [ Thu Nov 17, 2005 4:44 am ] |
Post subject: | |
When sanding the longer braces in the radius dish, I lay a piece of 1 X 3 across the dish, lay the tall edge of the brace against the edge of the 1 X 3 & sand away... Keeps the brace nice & square as long as you are sanding along a radial line from the centre of the dish. I also get the arch close with a plane, so I don't have to spend a ton of time sanding. |
Author: | Jimson [ Thu Nov 17, 2005 5:11 am ] |
Post subject: | |
Jon, My setup is much like yours ( I used iron pipe ) and I have noticed a couple things. 1) On steel-string braces I find that the TOP end of the go-bars are deforming the ply it pushes against. This hasn't been an issue with more lightly braced classic soundboards. 2) I have to use a clamp to keep the dish from twisting sideways as I add more bars. Just my observation - I also consider myself a Nubi-Wan. |
Author: | tl507362 [ Thu Nov 17, 2005 6:00 am ] |
Post subject: | |
Glad you like it Lance! After you cut them on your jointer you should lightly sand in the dish to get the spherical curve of the dish. It will still work, but I think it will have more of a tendency to tilt on you if you don't complete the sperical curve in the dish. By the way, I'm still offering OLF members a discount on the brace maker jig. It is a hidden link on my website. You can get it for $49 instead of $59. HERE Tracy |
Author: | CarltonM [ Thu Nov 17, 2005 7:54 am ] |
Post subject: | |
[QUOTE=letseatpaste] I'm going to have a cylindrical top instead of spherical. So when I'm sanding the profile to the bottom of the X-brace pieces, I need to hold them at 45 deg as I sand it back and forth in the cylindrical dish, to get the right profile on the bottom of the brace.[/QUOTE] Jon, I'm planning to do something similar, and I'm wondering--have you tried gluing the X together first, and sanding it as a (more stable) unit? |
Author: | letseatpaste [ Thu Nov 17, 2005 8:04 am ] |
Post subject: | |
[QUOTE=CarltonM]I'm planning to do something similar, and I'm wondering--have you tried gluing the X together first, and sanding it as a (more stable) unit? [/QUOTE] I can't remember if we did that in class or not. This'll be my second bracing job ever. But yeah, I had considered doing it like that. |
Author: | Tom Dowey [ Thu Nov 17, 2005 8:15 am ] |
Post subject: | |
Tracy, Sold, I just PayPal'd you. |
Author: | tl507362 [ Thu Nov 17, 2005 8:53 am ] |
Post subject: | |
Thanks Tom! I hope you like it. I've only heard great things about it, and we use it at the school too where Robbie teaches. We went from cutting braces in 1 hour to 10 minutes. I had 2 students go down to the table saw, and returned in 10 minutes with 8 back braces cut! Let me know how you like it. Tracy |
Author: | Dave Rector [ Thu Nov 17, 2005 8:54 am ] |
Post subject: | |
I'm gonna have to get me one of those things. |
Author: | npalen [ Tue Nov 22, 2005 5:44 am ] |
Post subject: | |
I know this has been discussed at length previously but wondering if someone can give me a good source for fiberglass rods to use in the gobar deck? Best diameter? Thanks Nelson |
Page 1 of 2 | All times are UTC - 5 hours |
Powered by phpBB® Forum Software © phpBB Group http://www.phpbb.com/ |